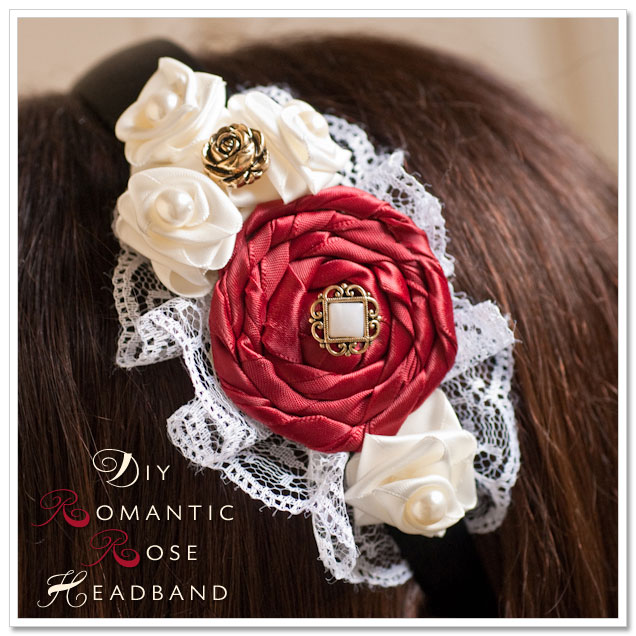
With Valentine’s Day right around the corner and spring wedding season almost in full swing, I wanted to create an easy, affordable DIY headband that’s both romantic and elegant. I’ve provided step-by-step instructions and photos for making your own Romantic Rose Headband to wear for any occasion!
What you’ll need –
- Satin headband (I used a black headband about 1″ at its widest point)
- 1-1/2″ wide double face satin ribbon in burgundy or red
- 5/8″ wide double face satin ribbon in ivory or white
- 1-5/8″ wide white lace ribbon (I used Wrights®)
- Scissors
- Needle and white embroidery floss
- Faux pearl beads
- Vintage-style buttons or findings
- Hot glue gun
- 2″ circle or scalloped circle punch
- Scrapbook paper (I used a vintage sheet music paper – you won’t see when finished, though)
- Lighter
How to make it –
Folded Ribbon Roses –
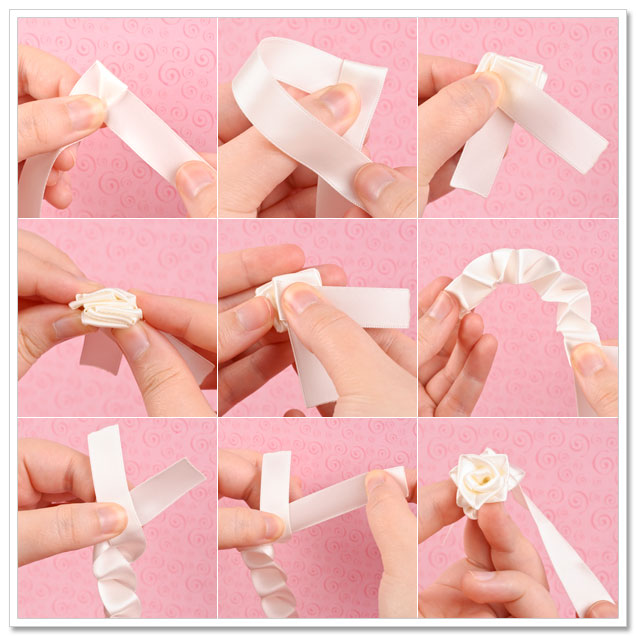
Let’s start by making the small ivory roses. I made four of them for this headband, but you can do as many as you like. Before your start, prepare your needle and white embroidery floss. Cut a short length of embroidery floss, thread it and knot the end – then set aside for later.
These are made with a folding method. Start with a 2-foot length of the ivory satin ribbon. Fold it in half so you’re holding a loop at the top. Take the top half of the ribbon and fold it under and to the right to create a triangular fold on top of the loop. Now you’ll have a right angle.
Keeping your fold pinched, flip the ribbon over so you’re looking at the back. Take the ribbon on the left and fold it over across the middle section. Now fold the ribbon at the bottom up over the center. Continue folding back and forth until you have about 1″ of ribbon left on each side.
You should have what looks like a stack of folds now. Pinch the center of where the two ribbon ends intersect tightly and release the stack of folds. You should have what looks like an accordion now.
Keep pinching your two ribbon ends together and pull the ribbon tail on your right. The accordion will bunch up to form the rose. Don’t let go or you’ll lose all your folds!
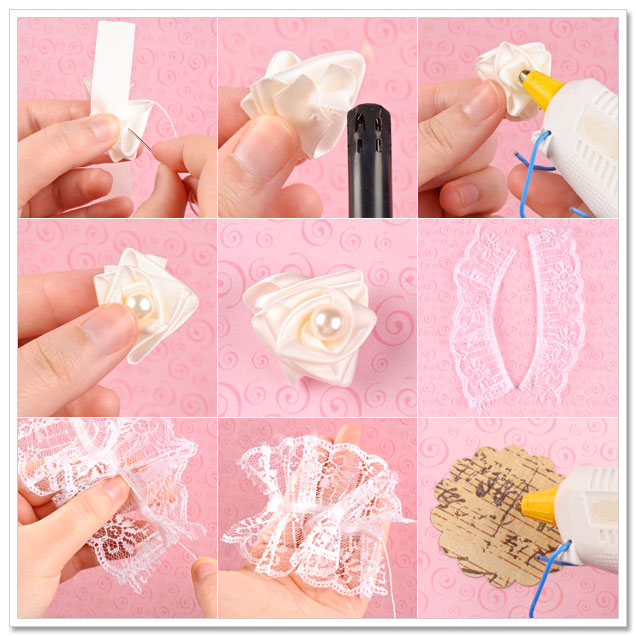
Grab your needle, flip the rose over and sew the two tails together (try to sew through the bottom layer of the rose). Knot the end and trim the floss. Next, you can trim the ribbon tails until they don’t stick out.
Grab your lighter and very carefully hold the trimmed ribbon ends near the flame. This will only work with satin ribbon (I haven’t experimented with other types of ribbon myself, but I think the flame will melt and/or burn the ribbon). Only a second or two is necessary – the flame will seal off the ends of the ribbon and prevent fraying.
Next, take your glue gun, put a dot of glue in the center and affix your faux pearl bead. Repeat to make as many small roses as you’d like and set them aside.
Lace –
Now, we’re going to work with our lace ribbon. Again, make sure you have your needle and white embroidery floss ready.
Cut a 1-foot length of the lace, then cut it in half into two 6″ pieces. Lay them so the interior, straight edges of the lace are facing each other and just slightly overlapping at the center.
Now, we’re going to sew the two pieces together. Start at one end and create large, widely spaced stitches all the way to the other end. Pull the floss gently so the lace bunches up (you want it to shorten to about 4″ or 4-1/2″ in length). Knot the end, trim the floss and set the lace aside.
Ribbon Rosette –
Lastly, we’re going to make the larger, burgundy rosette. I only made one – the focal point of the headband – but again, you can do whatever you’d like!
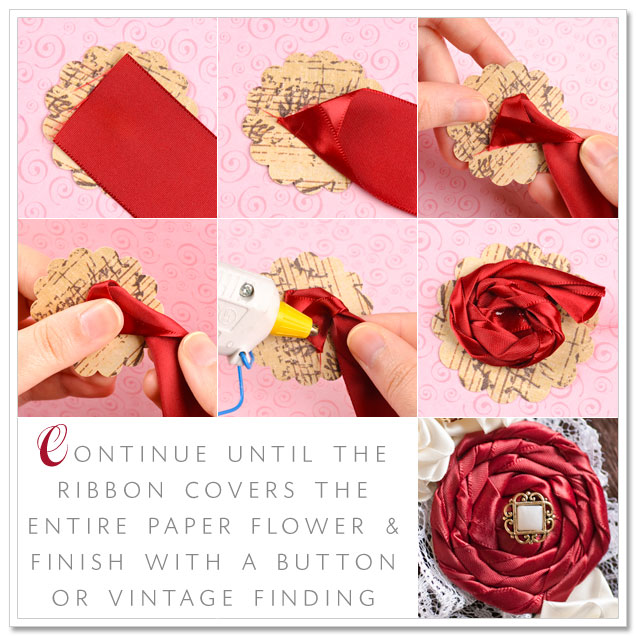
Take your circular punch and punch out a circle from your scrapbook paper. Cut a 2-foot length of your burgundy ribbon, place a dot of hot glue in the center of your paper circle and attach one end of the ribbon. (Note: I was unable to find a double-faced satin ribbon in the color I wanted, so one side of my ribbon was “dull.” If you encounter this problem, be sure to glue your ribbon onto the circle shiny side down – I discovered this was best through trial and error.)
Place another dot of hot glue in the middle of the ribbon and fold both edges in to create a triangular point. Take your ribbon and twist it back twice. Place a dab of hot glue near the edge of the ribbon center and press the twisted ribbon into it.
Think of this as a “dab and twist” method as you work your way around in a circular motion. The finished look of your rosette will depend on how tightly or loosely you twist your ribbon. Either way looks great – it’s just a matter of personal preference.
Again, you’re going to twist your ribbon back twice, dab some glue and curve the twisted portion around the center section in a clockwise pattern. Keep going until your ribbon covers the entire paper circle. I had a little ribbon tail left over, so I just twisted it once and glued it to the bottom of the paper circle.
Glue your favorite vintage-style button or finding in the center (or even do a cluster of faux pearls, if you prefer).
Assemble Headband –
Now, all your headband elements are complete so you can assemble it! I placed the large burgundy rosette first (about 3″ to 3-1/2″ from the end of the headband), since it’s the focal point. Dab some hot glue on the bottom of your rosette and hold it in place for a few seconds on the headband.
Next, arrange your smaller ivory roses. I grouped three together above the burgundy rosette and one below, but do whatever you like. I also glued another vintage-style button in the middle of the group of ivory roses.
Lastly, you’re going to put the lace on. Run a thin line of hot glue on the underside of the headband and attach the lace.
That’s all there is to it. Enjoy, lovelies!
Linked to Weekend Wrap Up Party // Tip Me Tuesday // Get Your Craft On // Whatever Goes Wednesday // All Things Inspired